This section was written very quickly. I will update it with more detail later.
Step 1: AutoSync Bash Script
We’ll need a script that automates the entire sync process and logs the outcome for you.
I have created a script, all you need to do is save it somewhere on your computer and add your Vault locations to the script. I know the use of emojis in software development is controversial, but I like them for logs. You can remove them, they start/end with :
[info]
Specifically you need to tell it where your vaults are by giving it the file-path to your vault(s). Add it under the variable VAULT_PATHS
Step 2: CronJob for Script Automation
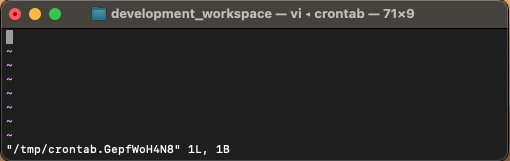
Then add that script to your crontab (MacOS) This is very easy. Just open a terminal, issue this command:
crontab -eThen you’ll see a text editor (vi) in your terminal:
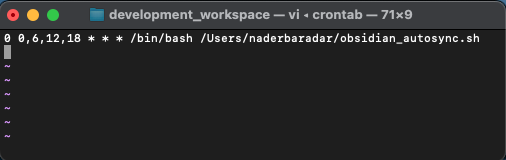
Copy this to your clipboard
0 0,6,12,18 * * * /bin/bash /Users/naderbaradar/obsidian_autosync.shThen go back to the terminal and press i on your keyboard to enter “Insert” mode and paste the line:
Finally, press : (colon) to enter “Command” mode and then type in wq
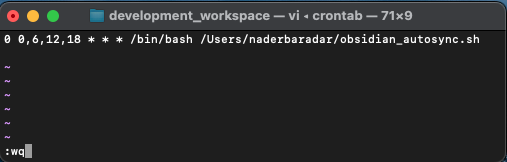
This will write to the file and quit the text editor (vi). You have now scheduled your script to run automatically everyday at these times:
- 12:00 AM
- 06:00 AM
- 12:00 PM
- 06:00 PM
If you want to change the times/frequency you can play with the Crontab line.
Finally, you can validate that crontab registered your cronjob automation by issuing the crontab -l command, and you should see your cron job listed.
naderbaradar@Naders-MacBook-Air development_workspace % crontab -l

0 0,6,12,18 * * * /bin/bash /Users/naderbaradar/obsidian_autosync.sh
IMPORTANT
For crontab to work you may need to give it full disk access (depending on where your obsidian vault is stored. Mine is stored in my iCloud directory)
Steps:
- Open System Settings
- Go to Privacy & Security → Full Disk Access
- Click the
+button - Press
Cmd + Shift + Gand enter:/usr/sbin/cron